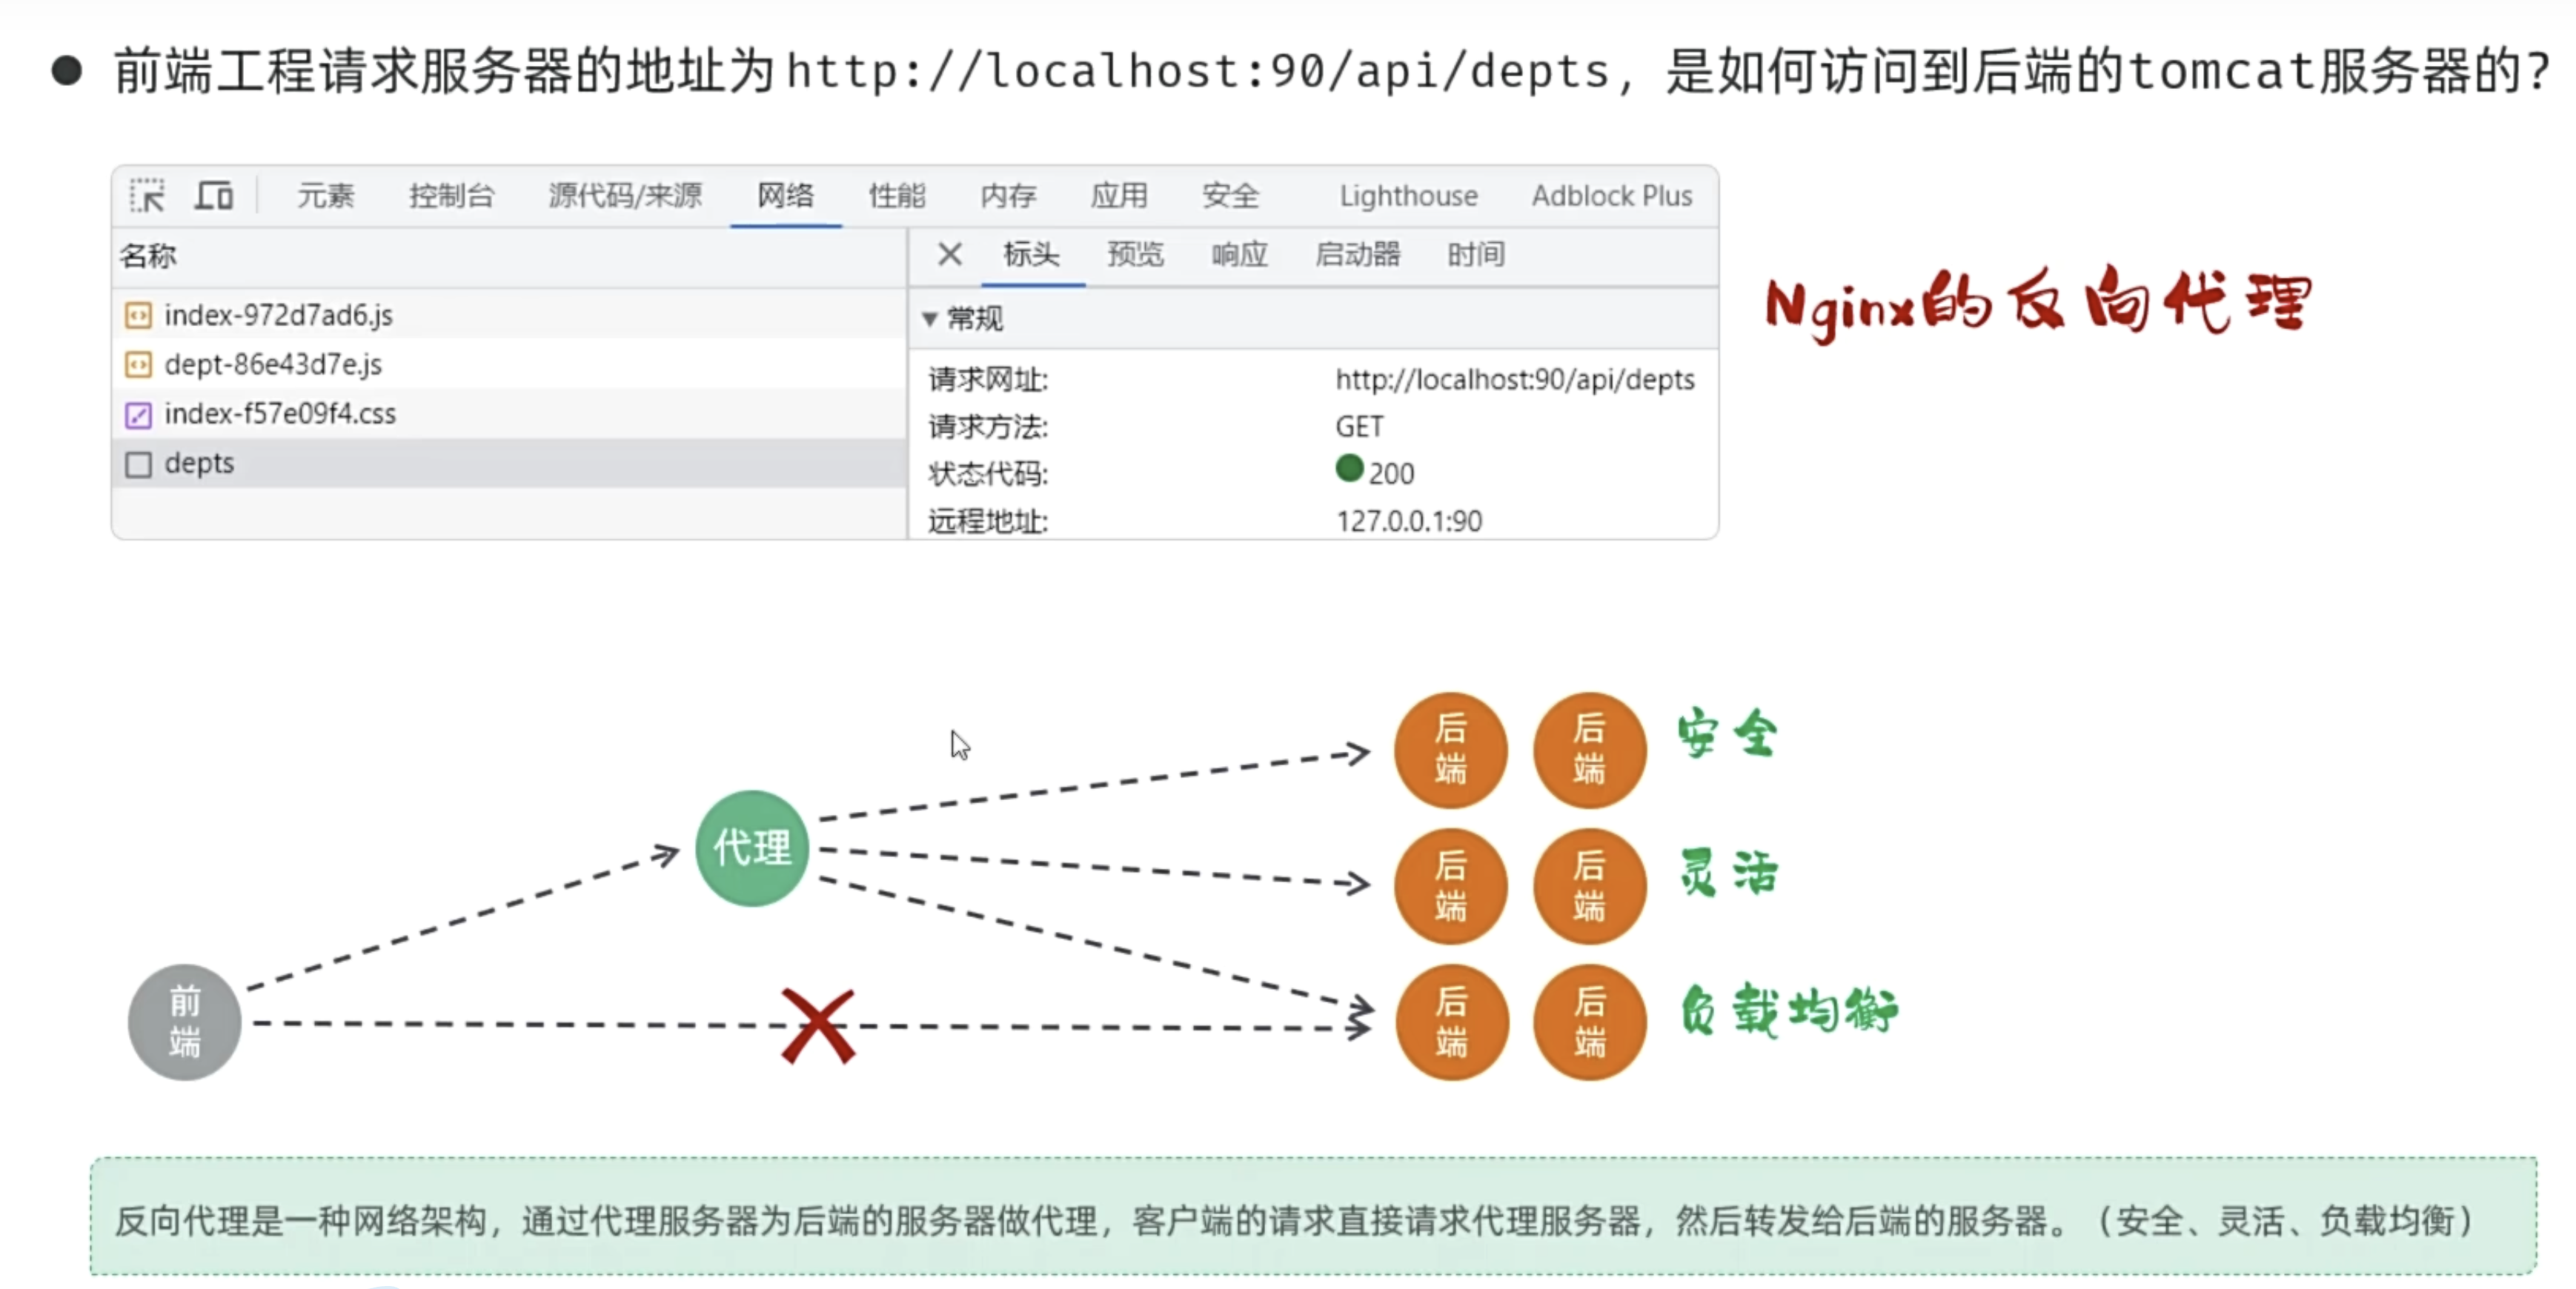
macOS 启动 Nginx 完整指南
🚨 重要提示
nginx.exe 是 Windows 可执行文件,无法在 macOS 上直接运行!
您需要在 macOS 上重新安装 Nginx。
方案一:使用 Homebrew 安装(强烈推荐)⭐
Step 1: 安装 Homebrew(如果还没有)
/bin/bash -c "$(curl -fsSL https://raw.githubusercontent.com/Homebrew/install/HEAD/install.sh)"
Step 2: 安装 Nginx
brew install nginx
Step 3: 启动 Nginx
# 方法1: 直接启动
sudo nginx

# 方法2: 使用 Homebrew 服务(推荐)
brew services start nginx

# 查看状态
brew services list
Step 4: 验证安装
# 检查 Nginx 版本
nginx -v

# 测试配置文件
nginx -t

# 访问测试
open http://localhost:8080
常用命令
# 启动
brew services start nginx
# 或
sudo nginx

# 停止
brew services stop nginx
# 或
sudo nginx -s stop

# 重启
brew services restart nginx
# 或
sudo nginx -s reload

# 查看状态
brew services list
方案二:迁移您当前的配置
如果您想使用当前目录的配置文件:
Step 1: 安装 Nginx(同上)
brew install nginx
Step 2: 复制配置文件
# 找到 Homebrew 安装的 Nginx 配置目录
# 通常在:/opt/homebrew/etc/nginx/ 或 /usr/local/etc/nginx/

# 复制您的配置
cp ~/用户/oxy/文稿/program/front/nginx-1.18.0/conf/nginx.conf /opt/homebrew/etc/nginx/nginx.conf

# 复制 html 文件
cp -r ~/用户/oxy/文稿/program/front/nginx-1.18.0/html/* /opt/homebrew/var/www/
Step 3: 测试并启动
# 测试配置
nginx -t

# 启动
sudo nginx
快速启动指南(推荐新手)
# 1. 安装 Nginx
brew install nginx

# 2. 查看安装位置
which nginx
# 输出:/opt/homebrew/bin/nginx

# 3. 查看配置文件位置
nginx -t
# 输出:nginx: configuration file /opt/homebrew/etc/nginx/nginx.conf test is successful

# 4. 启动 Nginx
brew services start nginx

# 5. 验证运行
curl http://localhost:8080
# 或在浏览器打开 http://localhost:8080

# 6. 查看日志
tail -f /opt/homebrew/var/log/nginx/access.log
tail -f /opt/homebrew/var/log/nginx/error.log
常见问题解决
1. 端口被占用
# 查看占用端口的进程
sudo lsof -i :8080

# 杀死进程
sudo kill -9 <PID>
2. 权限问题
# 确保有执行权限
sudo nginx

# 或修改配置文件中的用户
# 编辑 /opt/homebrew/etc/nginx/nginx.conf
# 将 user nobody; 改为 user 你的用户名;
3. 配置文件路径
# Homebrew 安装的 Nginx 配置文件位置
# Intel Mac: /usr/local/etc/nginx/
# Apple Silicon (M1/M2): /opt/homebrew/etc/nginx/

# 网站根目录
# Intel Mac: /usr/local/var/www/
# Apple Silicon: /opt/homebrew/var/www/
我的推荐方案 🎯
我建议:
- 使用 Homebrew 安装 Nginx(最简单)
- 将您的配置文件复制到新的 Nginx 配置目录
- 将 html 文件复制到新的网站根目录
具体操作:
# 1. 安装
brew install nginx

# 2. 备份原配置
cp /opt/homebrew/etc/nginx/nginx.conf /opt/homebrew/etc/nginx/nginx.conf.backup

# 3. 复制您的配置(需要调整路径)
cp ~/用户/oxy/文稿/program/front/nginx-1.18.0/conf/nginx.conf /opt/homebrew/etc/nginx/

# 4. 复制网站文件
cp -r ~/用户/oxy/文稿/program/front/nginx-1.18.0/html/* /opt/homebrew/var/www/

# 5. 测试配置
nginx -t

# 6. 启动
brew services start nginx
Nginx常用命令
先复习下部署nginx时可能会用到的命令
# 运行以下命令来安装Nginx:
brew install nginx

# 启动nginx
nginx
# 启动时权限不够就sudo
sudo nginx

# 查看nginx占用端口
ps -ef|grep nginx
# 查看端口占用情况
lsof -i:8080

# 查看nginx安装目录、编译参数、配置文件、日志文件的位置等信息
nginx -V
# 查看conf位置
nginx -t

# 优雅停止
nginx -s quit
# 立即停止
nginx -s stop

# 重载配置文件
nginx -s reload
# 重新打开日志文件
nginx -s reopen
部署文件
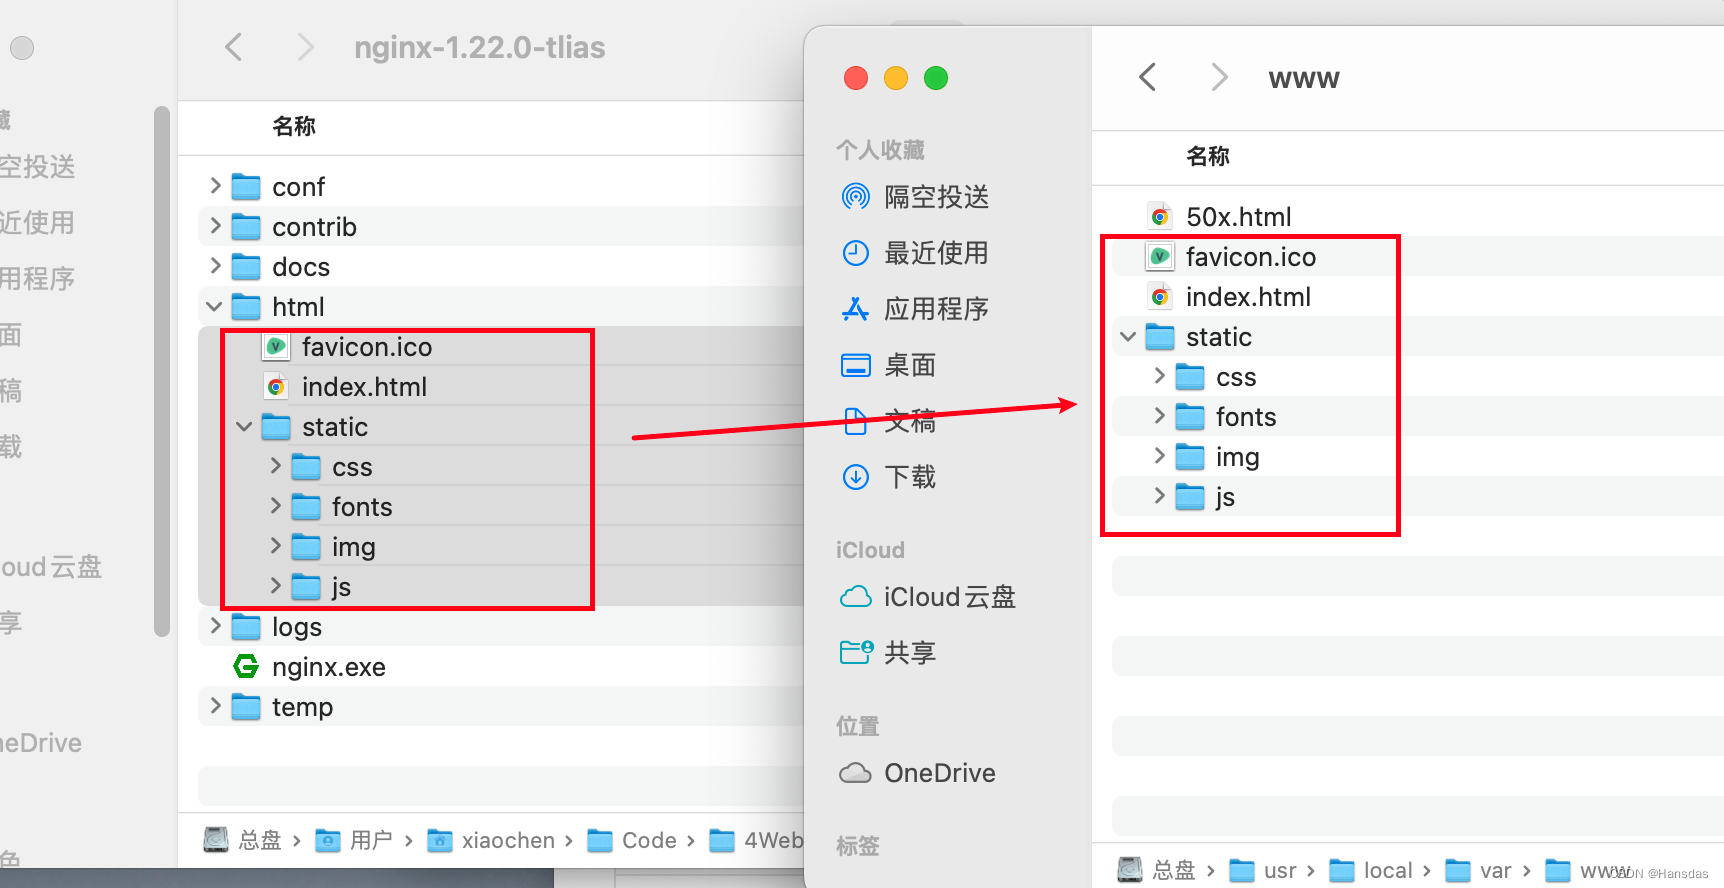
macos默认的nginx根目录(Document Root)一般位于 /usr/local/var/www 目录下,把打包好的前端文件放进去就好
启动Nginx
直接terminal启动
sudo nginx
然后出问题了,nginx: [emerg] still could not bind()
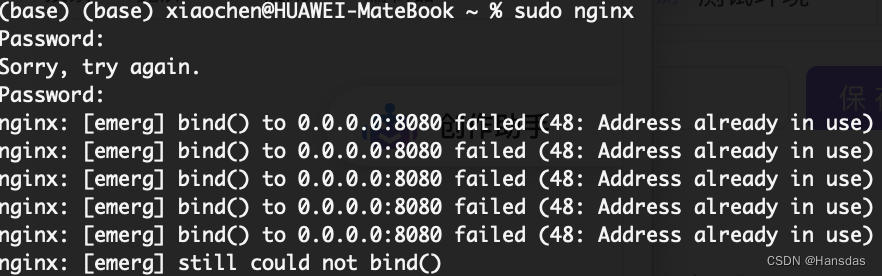
其实就是我这里nginx默认的8080端口被springboot tomcat占用了,下面改下端口就行
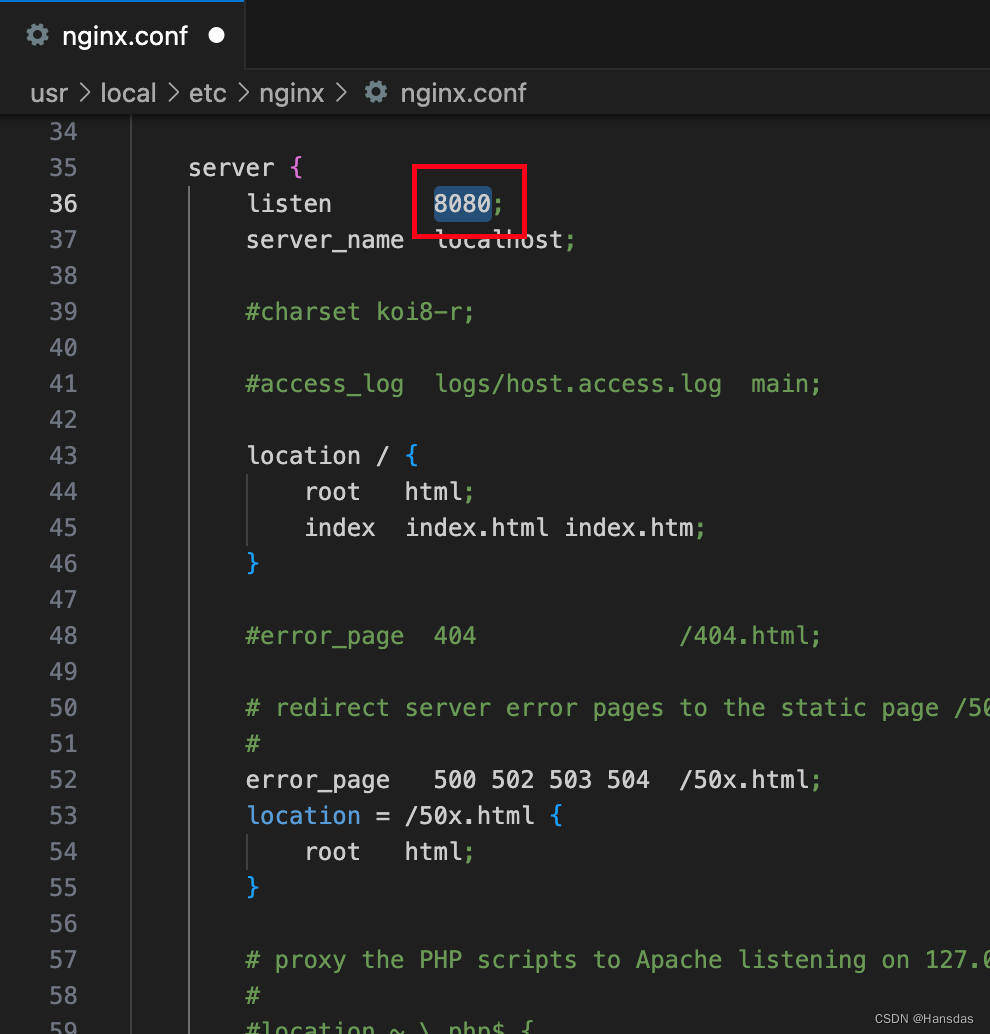
更改默认端口
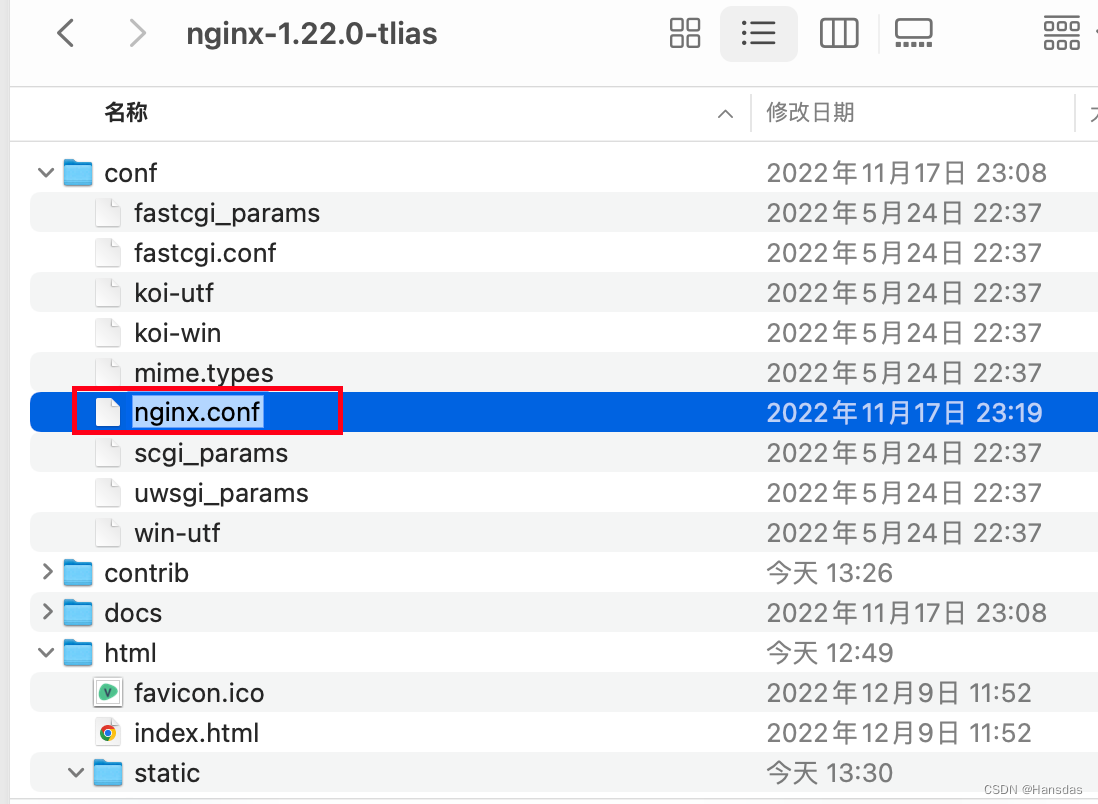
找nginx.conf文件
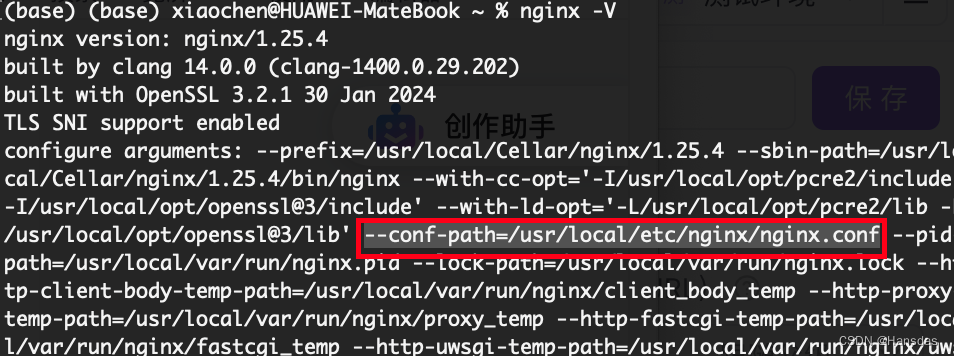
主要是取conf文件里改,那么第一步就是要找到conf文件
这里有两种办法找到conf文件的路径
第一种:会显示一大堆信息,要仔细找到conf path
nginx -V
第二种:就很直观,只是找conf文件还是比较推荐直接这样
nginx -t

直接根据上面查到的路径打开文件更改端口就行,我后来改成90了
重新启动
没消息就是最好的消息

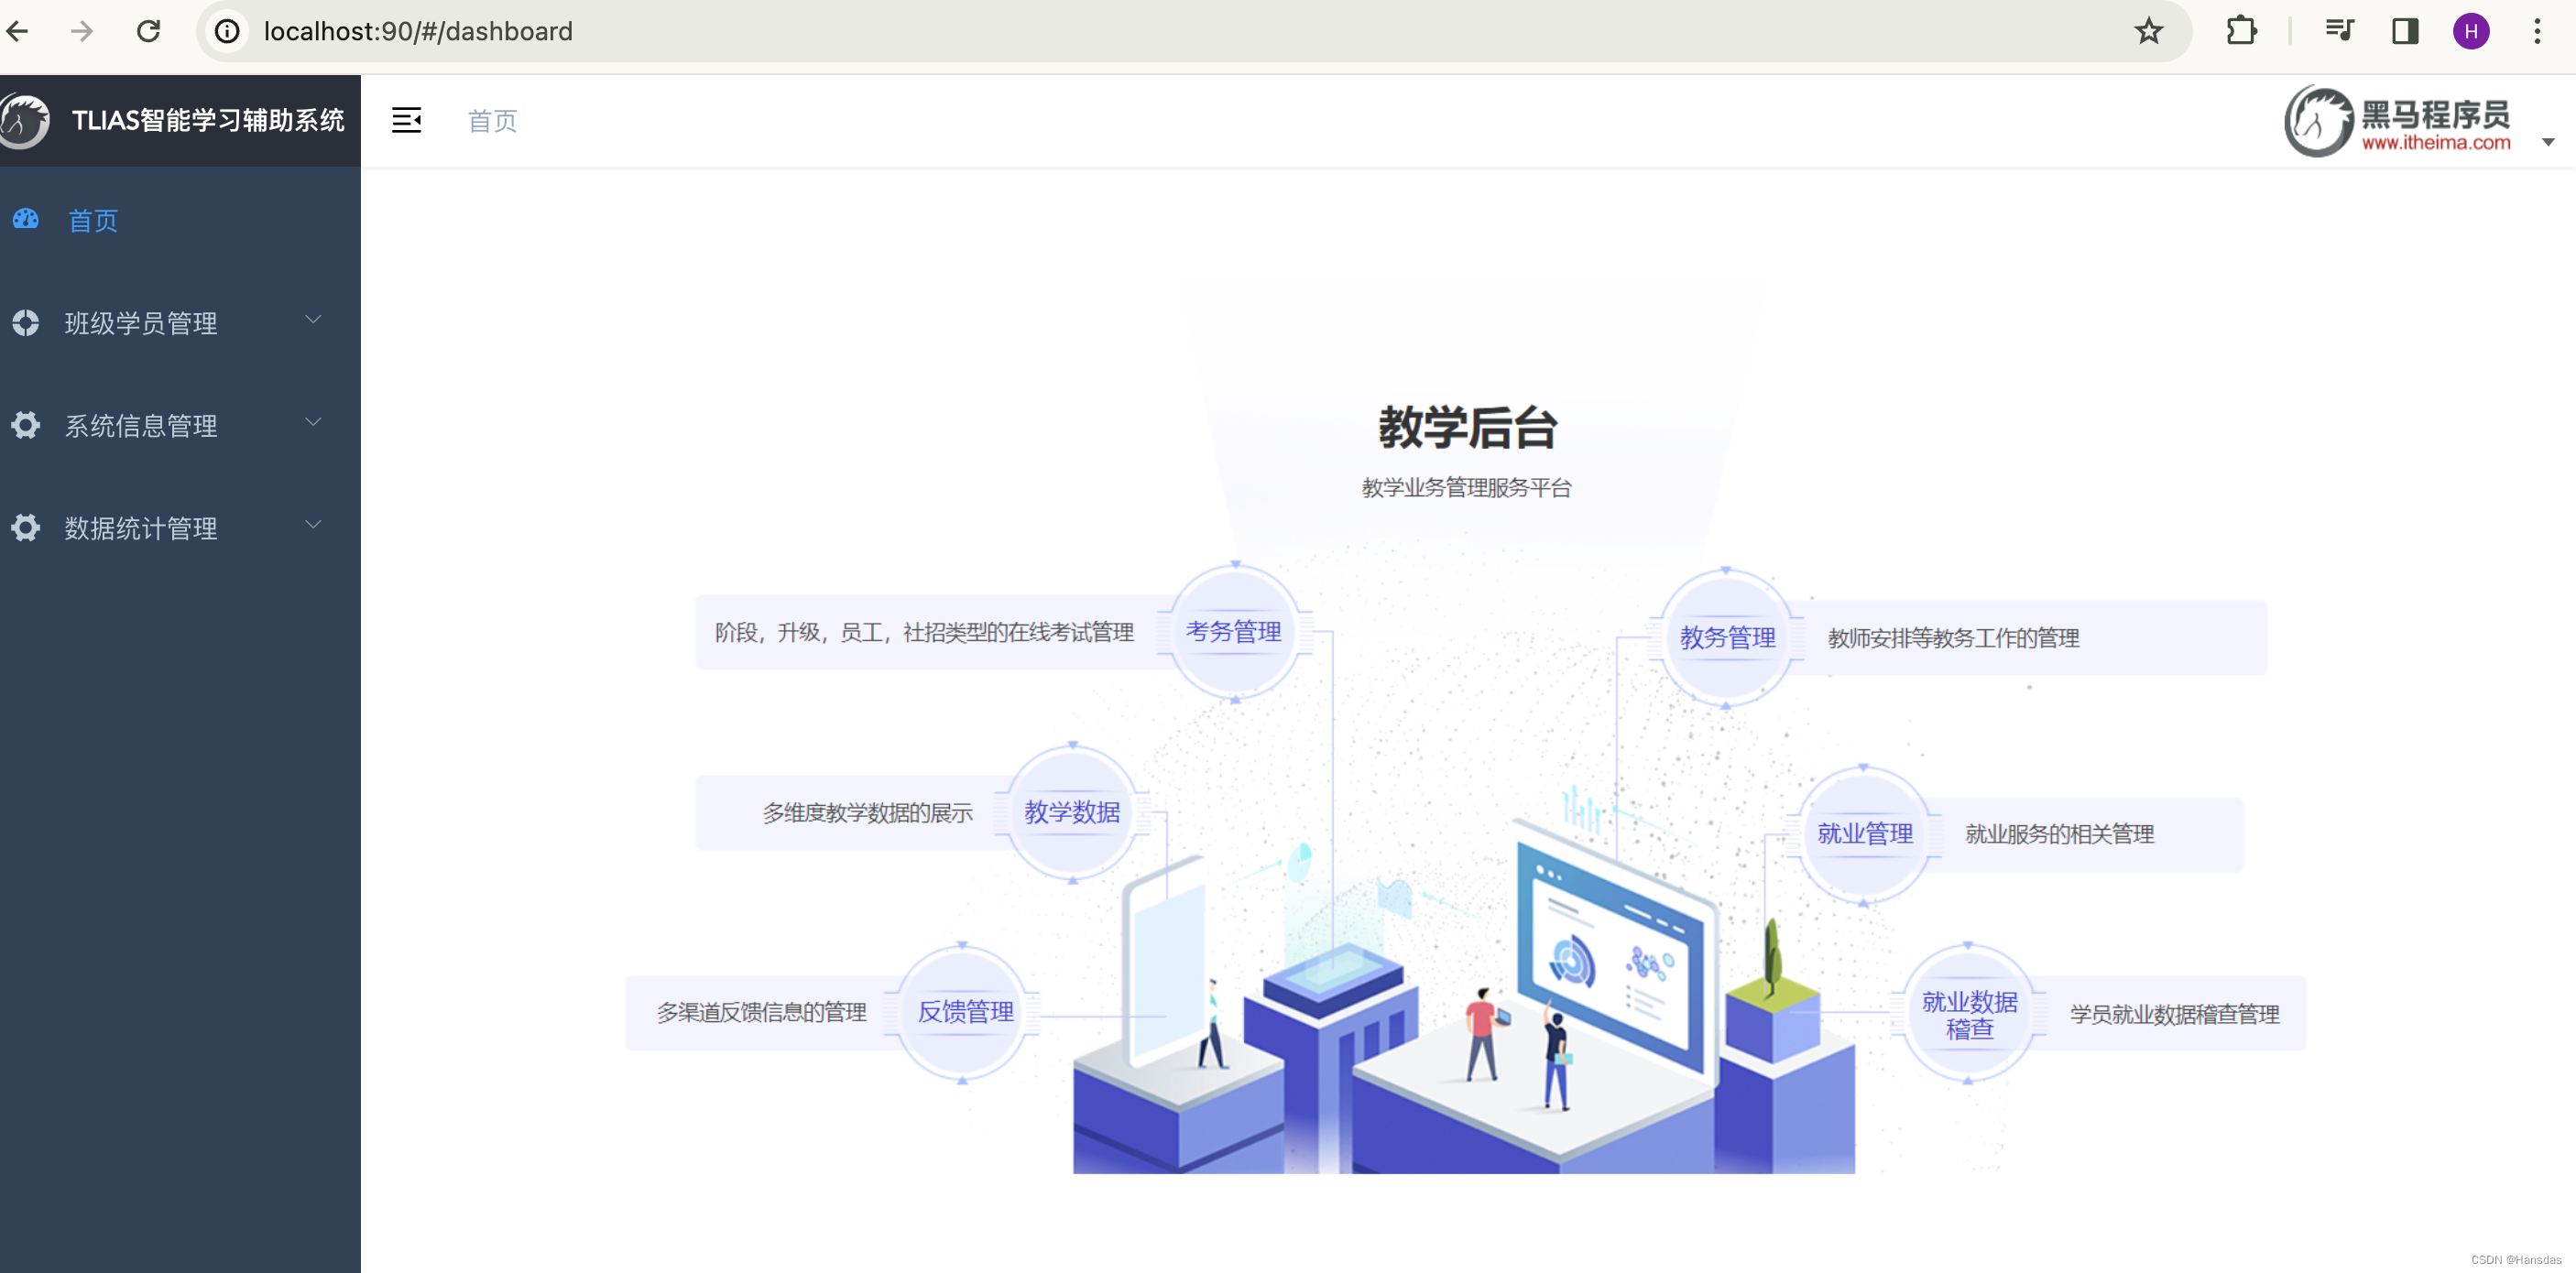
浏览器访问端口也没啥问题
* 数据缺失问题
如果只是按上面流程在conf里改个端口号是不会加载进数据库数据的,因为只是部署了前端页面,没有完成前后端联调,ajax读不到后端数据
把课程资料里的nginx.conf文件内容替换到刚刚本地nginx.conf文件里就好了
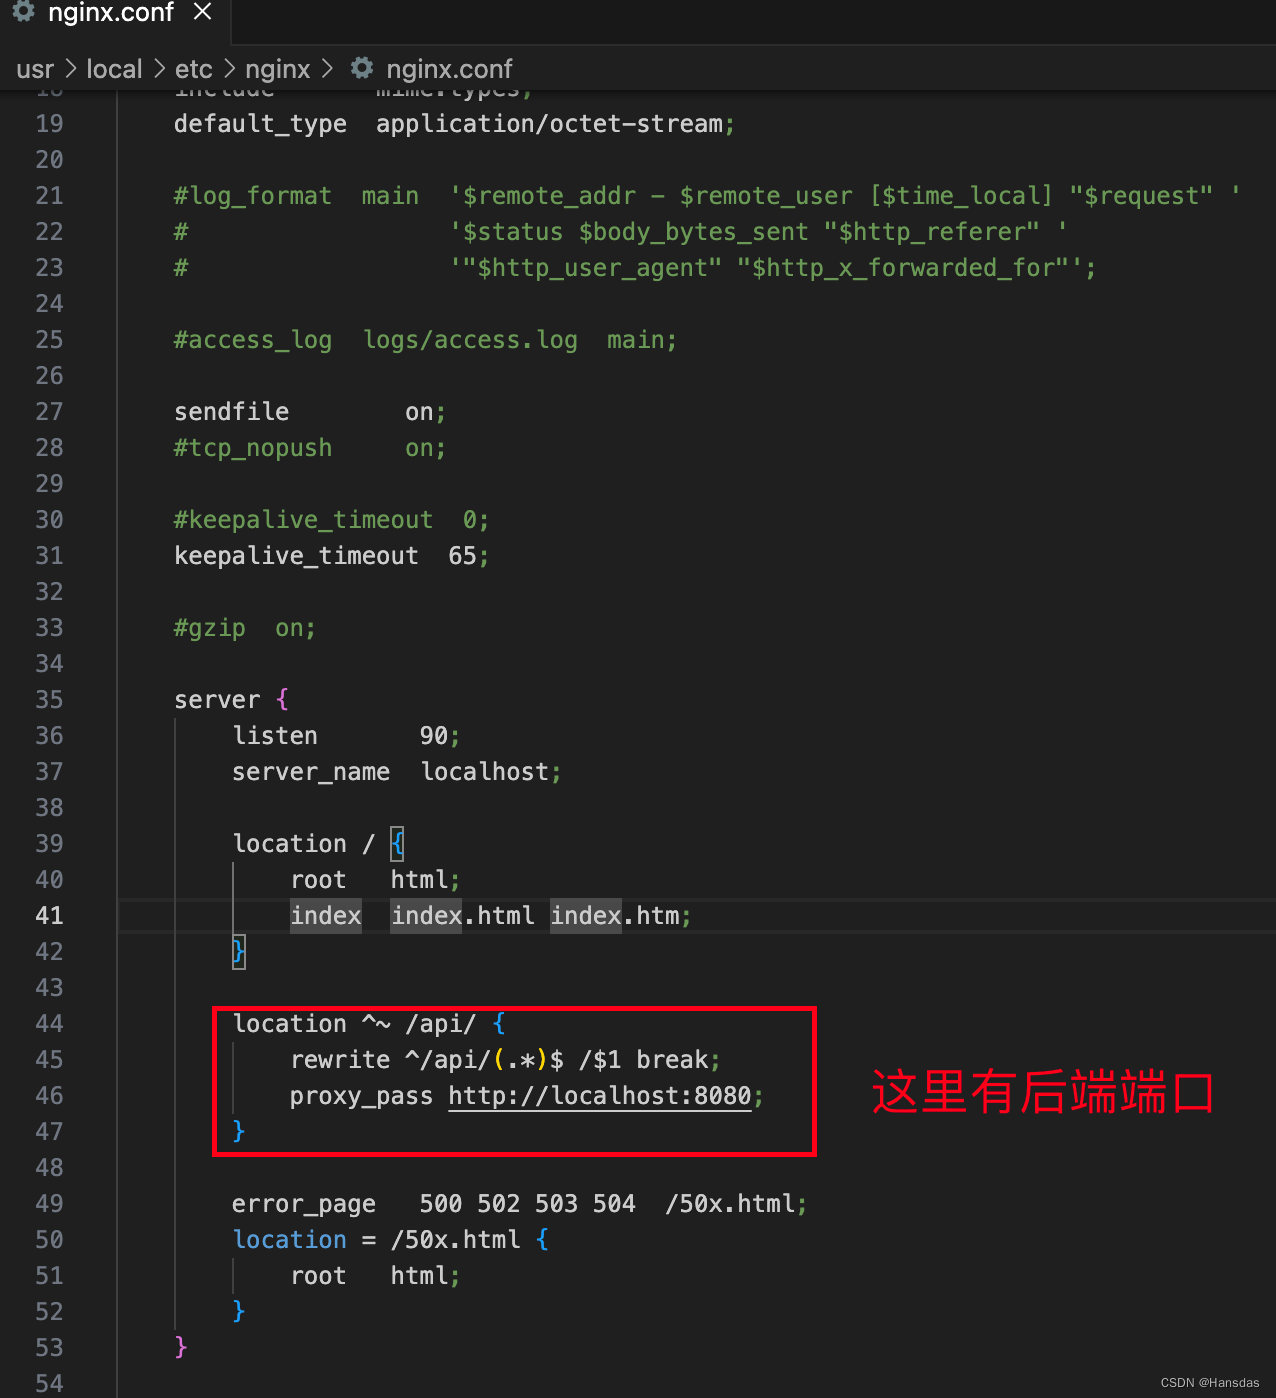
然后reload一下
sudo nginx -s reload
读进来力